8.31.2011

Pom Pom Ball Tutorial With A Little Twist

Pom Pom balls are nothing new and tutorials abound everywhere....but somehow, none of them were what I was looking for. I wanted to have some beautiful pom poms as decor at my sister's recent bridal shower, with different sizes and colors in various locations.

There are tons of tissue pom tutorials out there like here and here, plus some amazing variations found here and here! My problem was that I wanted to put some of these pom poms outside, and I was certain my kids would have their little hands all over them within two seconds of seeing them......all I could imagine was squishing and ripping and complete badness. :-(

So...I turned to tulle. It's Seattle rain proof, unrippable (is that a word?), and if when squished will bounce right back! Sounds like my kind of pom pom ball! The tutorial I am basing mine off of today comes from this site.

Even though I was super excited about using the tulle, and that was what was used for the majority of the bridal shower, I was even more excited to experiment using muslin fabric for some of the poms (this was country/vintage themed) and ended up with these:


I loved them, my sister loved them ~ we were all happy. :-)


Here is a quick tutorial for those of you new to pom poms.
It is my inexpensive, super fast and easy version.
(LOTS of pictures!)


Start by cutting out cardboard templates. You can make them whatever size you want,
and they don't have to be cut perfectly.
Cut TWO circles per size, with 1"-2" holes in the center (depending on size).


Tie whatever you are using to hang the pom pom with, like you are tying a knot,
and place it on top of one of the template circles.


Tuck your ends around the circle.


Place the other template circle on top of the template with the string/ribbon.


Cut your fabric or tulle that will wrap around the template.


I suggest cutting about 3/4 the width of the circle for smaller poms,
and 1/2 the width of the circle for larger poms.
As for length, what ever looks right (roughly 4-10 ft. depending on the size)
You can also take two colors here, place them side by side,
and wrap them at the same time for a layered effect.


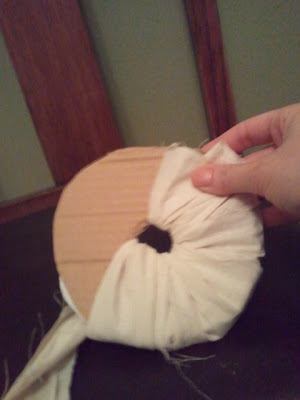
Place one end of the fabric through the center hole.


Place your thumb on the fabric to hold it down while you "thread" it around the template.


Wrap the fabric, tulle, or whatever around.....


And around.....


And around.....

OH NO! (Not really....but just in case) Your fabric wasn't long enough.
No worries....cut another one and start where you ran out!


Like this.


Finish wrapping up and trim the excess off the end.

~~~


Now for cutting.


Find an opening between your templates.


Cut the fabric around the outside edge, all the way around the template.
Be careful NOT TO CUT THE STRING!


Occasionally check where your string is and move it when necessary.
You don't want all your hard work to be gone in one snip!


YEAH! It's cut. Now the fun part.


Find the part of your string that's tied.


Cinch it down TIGHT and KNOT.


Pull the templates off from around the fabric.


Here it is...unfluffed and unpretty.


Fluff it up and give it a little haircut around the edges.
This will help to even it out if neccessary.


YOU DID IT! CONGRATULATIONS!


Here are some pictures from the poms poms at the bridal shower!


This larger one ended up being too heavy to "fluff", but I still LOVED it!


We had mixes of turquosie, silver, and white...
some were shiny mixed with matte,
and some had pretty crystals on them!


Love them!!!


FUN FOR EVERYONE!


These are truly fast, inexpensive, and impressively beautiful.
Not to mention easy to store if you'd like!
I hope you've found this helpful among the sea of so many other tutorials.
And I'd love to know if you use this and how they turned out for you!

~~~~~

Now I need to get to work in the shop so I'm switching things up a bit!
I'll be sharing some fun finds on Friday.


See you then!


~Anneke~


Proudly linking at:

Tutorials and Tips

Head's Up!


I'm SO excited!


Be on the look out later today for my little take on a pom-pom ball tutorial.
I know there are a lot of great ones out there,
but I just had to share with all of you.
It's super fast and fun (especially with some friends)! ;-)


In the meantime...

I'm working with my new Annie Sloan Chalk Paint - FINALLY!


Thank you Haley's Cottage in Kirkland!

(pictures of this beautiful and inspiring shop coming soon!)


~Anneke~


8.30.2011

Quick Tip Tuesday #2 PAINT!

Paint is by far one of the easiest and most affordable do-it-yourself methods to drastically change the way a room looks and feels.  The problem is...you may end up picking a color that doesn't convey the look and feel you want. What to do???  Ironically...my quick tip is -


TAKE YOUR TIME!


PLEASE!!!

Now I understand that sometimes we need to make quick decisions regarding these things, but unless you have more experience and design "eye", a quick decision in the realm of paint should usually stick to neutral territory in order to avoid a panic attack. :-)

Even in the building of our own home, we had to make a quick desicion on our interior paint. We stuck to neutral and although it bugs me that it's not what I had in mind and shows a pink undertone in certain lighting - it's tolerable. :-)

When selecting paint for your home, gather MANY swatches of paint, put them on the wall (or walls) of a room and observe how they look at different times of the day. Lighting is the largest factor in how a color will look in your home....shadows, sheen, how it looks from an adjoining room, and how it works with the accesories of the room. These are all factors to consider - I have a great example from the little house we stayed in the night before my sister's wedding.


Not the best pict. obviously, but the deep teal jewel toned wall was just enough punch of color to make this room feel pulled together and chic.  I can't wait to share some more pictures from this house!


Lastly, here is a great article I found on diynetwork.com on How To Select The Right Paint And Color For Your Home! It has great tips and goes into more depth on sheens, color theory, focal points, etc.

Bottom line....paint can be your best friend or worst enemy.
If in doubt..ask for some help!
I'm personally dying to try stenciling in the girl's room!


Up tomorrow - Pom-Pom Ball Tutorial


Happy Painting!


~Anneke~


8.29.2011

A Wedding Weekend!!!

So I've been busy, busy, busy with wedding preparations for my beautiful sister, and now that it's come and gone I want to tell you all about it! Especially because she had SO many great ideas! These are just a few pictures, most of them from the rehearsal and a couple from the wedding.  I'll get to share more as I get some professional photos. All I can say is...STUNNING!!!


This was not completely decorated in this photo,
but in the end it turned out beautifully for an aisle.  The venue was fantaastic!


The kids swinging on the HUGE swing. SO fun!
(As seen on my son's face)


Me and the other Bridesmaids the night of the Rehearsal.


Auntie being silly with my oldest daughter. :-)


Me and my daughters getting ready to "practice". 


My bouquet for the wedding. Doesn't it look gorgeous?! Thank you Geneva!!!


This was my sister's hanger for her wedding dress.
She just hot glued the pearl decal to the hanger.


Here are ours...I.LOVED.THEM.  I want to do this for my entire closet! :-)


Super YUMMY dessert table!
Underneath those treats is a table I get to refinish - YEAH!!! :-)


A LOT of dancing....it was fun to see the gals who know how to line dance
doing all the same steps together.


And of course....the beautiful bride! Love you sister!!!


This is just a glimpse into my wedding weekend.
More to come this week -  keeping on track for Quick Tip Tuesday,
a pom-pom ball tutorial, some pictures of the cute (and well designed) house
we stayed in the night before the wedding, and some belated bridal shower pictures!


Happy Monday!


~Anneke~


8.25.2011

Angh..my Riley Ratowski

He's had a lot of names over his 8 years of dogginess, but one of my favorites is Riley Ratowski.  He was my birthday present years ago from my hubby, and our first "baby".  Well...amidst the excitement of my sister's upcoming wedding on Friday, our poor Riley dog has had to endure this -


Doesn't he look happy? :-(

Nothing major. Just a spot on his head he won't stop scratching the living daylights out of.
I'm trying to give him the loving attention he needs in such a "sad" state,
but wedding events and celebrations are so demanding (and FUN!).


It's okay Riley dog....just a couple more days.


For the love of dogs! :-)

~Anneke~


8.24.2011

Pallet Decor Boxes


So I recently threw a bridal shower for my lovely sister,
in which a large number of fun and easy do-it-yourself projects took place.
Today I'd like to share the Pallet Boxes I made to display flowers at the shower.


This one was longer with chicken wire wrapped around it.

I made two of these shorter crates with bigger boards.


Let me tell ya...those boards were such a pain to rip off of the pallet...I actually couldn't even rip them off, so I grabbed the circular saw and just sawed them off. I swear my neighbors think I'm crazy....tugging and pulling, flipping the pallet over and finding all kinds of tools trying to pry this thing apart.  If I had been on it taking pictures to blog about it, then they'd really start to wonder.  I just needed the hubby home to take care of it in like 2 seconds. ;-)  But I conquered!


-Anyway, some basic directions-

1. Find a free pallet. Ours had been sitting outside our house for months,
so I decided to finally put it to good use! It was perfectly weathered! 

2. Cut the base and long side pieces at the same length.
Then cut the end pieces, matching in length.

3. Nail the long sides to the bottom (I used my pneumatic nail gun - favorite tool ever!)

4. Slap on the color of paint of your choice and Voila!  Rustic Pallet Boxes.
These fit the mason jars PERFECTLY!


I did sand the boxes to "blend" the paint a little,
and then added felt on the bottom for protection.


The beautiful bride! :-)


Me and my sis...being a photographer, she set up a photo booth. Fun! :-)


This is my favorite picture with Great Grandma Opal in the background.

 
On the longer box, I made it a little bit more sentimental in a way.  I used old wood from the pallet, new chicken wire spray painted black, borrowed mason jars from our mom, and blue paint as a base coat under the white. They turned out better than I thought they would, and I'm glad she liked them SO much that she's using them at the reception! Love you sister!!! :-)


How would you use these in your home or event? What colors would you try?
Be on the look out for some more diy projects from the shower,
and another exciting giveaway!


~Anneke~